Friday, October 21, 2011

Murano Glass

This design is created by Anastasia Luksha

Certified Educator of Entity, NSI, Supernail, Efexclusive.
Valid INES (International Nail Expert School) Judge
Double 1st place winner of NailPro IBS Las Vegas Competition, 2011.
Moscow, Russia

Murano glass is a famous product of the Venetian island of Murano. Located off the shore of Venice, Italy, Murano has been a commercial port as far back as the 7th century. By the 10th century, the city had become well known for its glassmakers, who created unique Murano glass. While Murano glassmakers have settled and operate elsewhere, some say authentic Murano glass is fabricated only in Murano.

Last year I’ve been to Venice for the first time and this city impressed me. Those romantic views, gondolas, Italian language, atmosphere, beautiful bridges… It’s impossible to describe it, it just worth to be seen. As a designer I was also obsessed with the Murano glass products when I saw it in the stores. Plates and cups, jewelry, furniture décor, all of it was so perfectly contoured that I just couldn’t stop looking at it. I took more that hundred photos of it, to keep all those ideas with me. So when I’ll be at home, I can just open my PC and remind myself of all these fabulous ideas and materialize them on nails…

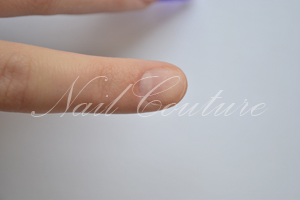
1. Prep the natural nail as usual, fit the form. Using Cover Pink Powder, extend the natural nail bed. 
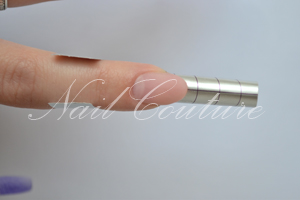
2। Using Clear acrylic powder, sculpt the free edge of the nail with a really thin layer as a base in a Pipe shape. Remove the form, gently pinch the nail.
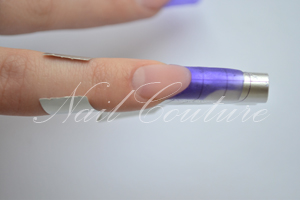
3. Take the golden foil and place it all over the surface of the base layer. Cover it with the clear acrylic. 
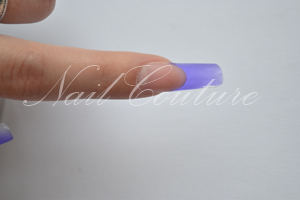
4. Add few drops of brown glass paint to the monomer. Take a bead of clear powder with colored liquid and extend it from the smile line to the free edge. While acrylic is wet, cut the Turkish cucumbers using dots tool. 5. This is how it looks from the underside. 6. Cover the surface with the clear acrylic. 7. File and shape the nail, buff the surface. 8. Cover the nail with the Finish gel.


Take some vivid and contrast colors to create this kind of design – silver foil and dark blue glass paint, golden foil and red, bronze foil and deep purple. Just use your imagination!

Friday, October 7, 2011

Halloween

“Trick or treat” step by step.
The word Halloween is first attested in the 16th century and represents a Scottish variant of the fuller All-Hallows-Even ("evening"), that is, the night before All Hallows Day.
Halloween is an annual holiday observed on October 31. Are you ready for it?
Here’s some design ideas for this holiday – your clients will definitely love it!
This step by step design is done by Luksha Anastasia and Makhitarova Tatiana.
To create this design you’ll need:
Purple glass paint
Purely Pink Masque powder and Totally clear powder
Technailcolor powders: orange, green, brown.
Acrylic paints: black, white, orange, green.
  1. Prep the natural nail as usual.
  2. Fit the Platinum nail form. Using Purely Pink Masque, extend the natural nail bed.
  3. Add three drops of purple glass paint to the Attraction liquid. Using Tottaly Clear and colored monomer sculpt the free edge and leave a small spot in the corner clean. Sculpt that corner using Totally Clear with pure liquid.
  4. Gently pinch the nail. File and shape the nail, buff the surface with a 240 grit buffer.
Now it’s time to create the design.
  1. Using orange acrylic powder, sculpt the circles imitating the shape of the pumpkin.
  2. Sculpt the second row – the lobules. Add the leaves using green acrylic.
  3. Sculpt the scape of the pumpkin using brown acrylic. With black acrylic paint draw the nets in the clear corners of the nails.
  4. Add some shades and accents with acrylic paints; draw the rest of the nets and the spiders.
  5. Draw the pumpkin’s faces. Add some white spots on the nets with white acrylic paint. Use orange acrylic paint to draw the pupils and teeth of the pumpkins, rood on the back of the spider.
  6. Cover the entire surface with gel top, excluding the pumpkins. Condition the cuticle with the nurture oil.
The design is done!

Monday, October 3, 2011

Watercolor

Watercolor, also aquarelle from French, is a painting method. A watercolor is the medium or the resulting artwork in which the paints are made of pigments suspended in a water soluble vehicle. The traditional and most common support for watercolor paintings is paper; other supports include papyrus, bark papers, plastics, vellum or leather, fabric, wood, and canvas. Watercolors are usually transparent and it allows light to reflect from the surface of the paper. This gives a luminous effect.

Today, when the nail products give us endless opportunities, it is possible to create a pure watercolor effect using acrylic.

Who to achieve it?
Follow our step by step guide “Acrylic Watercolor” and you will find out!

1. Prep the natural nail as usual. Fit the Platinum nail form to sculpt the stiletto. I used two forms and sticked them together, in order to make it longer.


2. Extend the natural nail bed, using Purely Pink Masque powder.


3. Using Winning White powder mixed on the same bead with the Totally Clear, to achieve a light marbleizing effect, sculpt the free edge of the nail.


4. Cover the entire surface with the Totally Clear, file, shape and buff the nail.


To create a watercolor effect you should use only semi-translucent acrylic powders. There is also a way to create such kind of powder by yourself.
Take 6 parts of Basic Black powder, from Technailcolor collection, and 1 part of Opal Shimmer glitter and mix them together.

1. Create the first petals of the flowers using Basic Black mixed with Opal Shimmer.


2. Make the second row of the petals.


3. Add some leaves and lines to finish the composition.


4. Using black acrylic paint, make some accents on the flowers and leaves.


5. Cover the surface with Glaze ‘N Go, leaving some areas inside the petals as they are. Place rhinestones in the middle of the flowers.


For those who prefer some abstract lines and compositions to the floristic style, here’s another one.

1. Create some abstract lines with the Basic Black, leaving them dark on the one side, and going transparent form the other side.


2. Using acrylic black paint finish the composition.


3. Cover the entire surface using Glaze ‘N Go, leaving some areas as they are.


The design is done.